Category: Windows
Remote shutdown or reboot Windows 10 PC
- Run CMD as Administrator
- Type: net use \\ComputerName or \\ipaddress and use login and password of remote pc
- Type shutdown -r -f -m \\ComputerName -t 0 or \\ipaddress
net use \\192.168.0.1
The password or user name is invalid for \\192.168.0.1.

Enter the user name for '192.168.99.161': username
Enter the password for 192.168.99.161:
The command completed successfully.
shutdown -r -f -m \\192.168.99.1 -t 0
shutdown -f -r -m \\computername -t 0Настройки сетевых параметров windows из командной строки
Настраиваем IP адрес и остальные параметры TCP/IP
Первым делом нужно узнать имя интерфейса.
netsh interface ip show config
Допустим наш интерфейс называется Подключение по локальой сети
Настроим статический адрес 192.168.1.100 с маской 255.255.255.0 и шлюзом 192.168.1.1
netsh interface ip set address name="Подключение по локальой сети" static 192.168.1.100 255.255.255.0 192.168.1.1 1
Или же настроим получение адреса по DHCP. При том если до этого были настроены адреса статикой, то по DHCP придёт только ip адрес. DNS останутся статическими
netsh interface ip set address "Подключение по локальой сети" dhcp
Настройка статического DNS (192.168.1.204):
netsh interface ip set dns "Подключение по локальой сети" static 192.168.1.204
Настройка динамических DNS:
netsh interface ip set dns "Local Area Connection" dhcp
MS Office документы отображать отдельными кнопками на панели задач
Windows 10 English UK language
После обновления появился English UK language и не удаляется.
Удалить можно следующим способом:
Windows 10 Windows 8 RDP CredSSP Encryption Oracle Remediation Error Fix
После обновлений Windows10 при попытке подключиться к Windows Server 2012 или 2016 c Windows 10 выходит эта ошибка
This could be due to CredSSP Encryption Oracle Remediation

Помогает изменить ключ в реестре или добавить при его отсутствии по пути:
[HKEY_LOCAL_MACHINE\SOFTWARE\Microsoft\Windows\CurrentVersion\Policies\System\CredSSP\Parameters] “AllowEncryptionOracle”=dword:00000002
Перезагрузка не требуется.
Так же можно удалить обновление KB4103727
Или можно скачать файл реестра, распаковать и запустить.
Порты для ввода в домен компьютера из-вне сети
Для того, что бы из другой подсети ввести компьютер в домен необходимо на обоих фаерволах открыть порты:
UPD: 53,389,445,88
TCP: 445,88,389,135,49152-65535,139
Затребованный пакет безопасности не существует
При попытке подключиться по RDP с Windows XP SP3 к терминальному серверу на Windows 2008 R2 выходит сообщение: “Затребованный пакет безопасности не существует”
Что бы это вылечить надо сделать следующее:
- Click Start, click Run, type regedit, and then press ENTER.
- In the navigation pane, locate and then click the following registry subkey:
HKEY_LOCAL_MACHINE\SYSTEM\CurrentControlSet\Control\Lsa
- In the details pane, right-click Security Packages, and then click Modify.
- In the Value data box, type tspkg. Leave any data that is specific to other SSPs, and then click OK.
- In the navigation pane, locate and then click the following registry subkey:
HKEY_LOCAL_MACHINE\SYSTEM\CurrentControlSet\Control\SecurityProviders
- In the details pane, right-click SecurityProviders, and then click Modify.
- In the Value data box, type credssp.dll. Leave any data that is specific to other SSPs, and then click OK.
- Exit Registry Editor.
- Restart the computer.
How to delete hiberfil.sys and disable hibernate / как отключить гибернизацию и удалить hiberfil.sys
Удалить файл hiberfil.sys можно простым способом: отключить гибернизацию.
Для этого надо открыть cmd под повышенными правами и выполнить команду
powercfg.exe -h off
Перезагрузка не требуется.
В данном примере освободили 8,8 гб места

Remote Desktop Service and DNS Resolver service
После удаления антивирусом файла ctfmon.dll из c:\windows\system32 и перезагрузки сервера служба Remote Desktop Services не запускается, так как не запускается дочерняя служба DNS Resolver.
Оказалось, что ctfmon.dll это зловредный файл, который был частью зловредной службы DNS Resolver.
При попытке запустить службу вываливается ошибка

Windows 10: Entering Safe Mode without access to Startup Settings
16 July 2021
Windows, Windows10
No Comments
bakabuka
In some cases, the Startup Settings option does not display. Open Windows in Safe Mode using Command Prompt.
- Turn on your computer and repeatedly press the esc key until the Startup Menu opens.
- Begin a System Recovery by pressing F11. If prompted, select your keyboard layout.
- The Choose an option screen displays. Click Troubleshoot.
- Click Advanced options.
- Click Command Prompt to open the Command Prompt window. You might need to select your account and enter your password to continue.

- Enter the command for the Safe Mode option you want. Enter the information exactly.
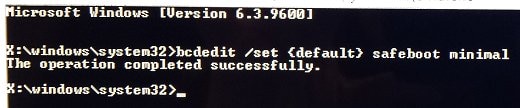
- Enable Safe Mode – Type:bcdedit /set {default} safeboot minimal and press Enter.
- Enable Safe Mode with Networking – Type: bcdedit /set {default} safeboot network and press Enter.
- Enable Safe Mode with Command Prompt – Type:bcdedit /set {default} safeboot minimal and press Enter, and then type:bcdedit /set {default} safebootalternateshell yes and press Enter.The operation completed successfully displays when you have entered the command correctly.
- Close the Command Prompt window by clicking the X in the upper right corner.
- The Choose an option screen displays. Select Continue and sign in to Windows with your account name and password.NOTE: You need to enter your Windows account name and password to log on in Safe Mode. You cannot log on using another method, such as a Personal Identification Number (PIN) or a fingerprint reader.The computer opens the desktop in Safe Mode.
Read More »