Windows 10: Entering Safe Mode without access to Startup Settings
In some cases, the Startup Settings option does not display. Open Windows in Safe Mode using Command Prompt.
- Turn on your computer and repeatedly press the esc key until the Startup Menu opens.
- Begin a System Recovery by pressing F11. If prompted, select your keyboard layout.
- The Choose an option screen displays. Click Troubleshoot.
- Click Advanced options.
- Click Command Prompt to open the Command Prompt window. You might need to select your account and enter your password to continue.

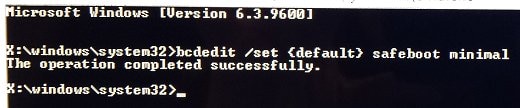
- Enter the command for the Safe Mode option you want. Enter the information exactly.
- Enable Safe Mode – Type:bcdedit /set {default} safeboot minimal and press Enter.
- Enable Safe Mode with Networking – Type: bcdedit /set {default} safeboot network and press Enter.
- Enable Safe Mode with Command Prompt – Type:bcdedit /set {default} safeboot minimal and press Enter, and then type:bcdedit /set {default} safebootalternateshell yes and press Enter.The operation completed successfully displays when you have entered the command correctly.
- Close the Command Prompt window by clicking the X in the upper right corner.
- The Choose an option screen displays. Select Continue and sign in to Windows with your account name and password.NOTE: You need to enter your Windows account name and password to log on in Safe Mode. You cannot log on using another method, such as a Personal Identification Number (PIN) or a fingerprint reader.The computer opens the desktop in Safe Mode.
How to get DID from SIP header
To get DID from SIP header just add in /etc/asterisk/extensions_custom.conf new context:
;Get did from SIP Header
[custom-get-did-from-sip]
exten => _.,1,Noop(Fixing DID using information from SIP TO header)
exten => _.,n,Set(pseudodid=${SIP_HEADER(To)})
exten => _.,n,Set(pseudodid=${CUT(pseudodid,@,1)})
exten => _.,n,Set(pseudodid=${CUT(pseudodid,:,2)})
exten => _.,n,Goto(from-trunk,${pseudodid},1)
After that just add in sip trunk peer details your new context
context=custom-get-did-from-sipAnd reload asterisk. fwconsole reload or amportal reload
Dell perccli on VMWare ESXi6 create raid5
Что б создать RAID5 из трёх дисков на VMware ESXi v6, используя perccli утилиту, нужно для начала выяснить номер контроллера. Если он один, то обычно его номер равен нулю. Выяснить командой, выполненной в консоли сервера под ssh:
./perccli showAsterisk error Couldn’t create astdb table: disk I/O error
Asterisk couldn’t start with error:
Couldn’t create astdb table: disk I/O error
Solution:
Move astdb.sqlite3 & astdb.sqlite-journal into a backup location. FreePBX regenerated databases
cd /var/lib/asterisk/
mv astdb.* /home
And restart asterisk
Asterisk PBX Check DND
To check DND status use asterisk cli:
asterisk -rx ‘database show’ | grep DND
Расширение LVM раздела
Увеличение размера LVM раздела путём расширения диска у гипервизора.
Допустим, что расширяем диск /dev/sdb на 30 гб, который является членом LVM /dev/mapper/lv
Read More »Восстановление InnoDB после переноса сервера
Допустим у нас есть сервер на Linux с базой MySQL. И нам понадобилось сделать копию сервера с живого рабочего. Или поднять из бэкапа, который был сделан со снапшота.
Вроде бы проблем быть не должно, но часто при таком переносе ломается InnoDB. Ниже приведу пример, как можно это исправить.
Заходим на сервер через консоль и необходимо сделать выгрузку всех баз. Если MySQL постоянно падает или не поднимается, то в некоторых случаях помогает следуюющее: вписать в конфиг файл /etc/my.cnf строчку в разделе [mysql]
Read More »Remote shutdown or reboot Windows 10 PC
- Run CMD as Administrator
- Type: net use \\ComputerName or \\ipaddress and use login and password of remote pc
- Type shutdown -r -f -m \\ComputerName -t 0 or \\ipaddress
net use \\192.168.0.1
The password or user name is invalid for \\192.168.0.1.

Enter the user name for '192.168.99.161': username
Enter the password for 192.168.99.161:
The command completed successfully.
shutdown -r -f -m \\192.168.99.1 -t 0
shutdown -f -r -m \\computername -t 0Generate .PFX from .CRT and .KEY
Что бы сгенерировать сертификат формата pfx из открытого и закрытого ключа под Linux достаточно одной команды:
# openssl pkcs12 -export -out certname.pfx -inkey private.key -in certificate.crt
Где certname.pfx это имя будущего файла сертификата
private.key – закрытый ключ
certificate.crt открытый ключ
Будет предложено задать пароль. Это опционально, можно не задавать.
Zimbra: update ssl certificate Using the CLI
13 April 2022
Linux, Uncategorized
No Comments
bakabuka
As example you bought comodo ssl cert and received 2 zip archives.
Unpack STAR.my_domain_com_cert and STAR.my_domain_com_key
Copy private key to /opt/zimbra/ssl/zimbra/commercial folder/
copy STAR.my_domain_com.ca-bundle to /tmp folder
copy domain cert to /tmp folder
Check under non-root user that your SSL certificate, your private key and the Intermediate CA are OK, this step is important and you should not continue if you receive an error here
Deploy the commercial certificate with zmcertmgr as the non-root user
Restart the Zimbra Services
certcertificatecomodomailsentigosslzimbra